Garage door sensor no light is a very common problem that a homeowner often faces with his garage door opener system. Sometimes it is a very small issue and you can solve it on your own by adjusting some wires but sometimes it’s complicated and needs the replacement of faulty garage door sensors.
But the main concern is how to identify the cause of the no-light problem of your garage door sensor.
One of the most common reasons behind your garage door sensor’s no light problem is broken wires, maybe your dog or puppy chews on the low voltage wire of any one of the sensors and causes no light issue in your garage door.
The majority of people have garage door sensors from one of these brands namely Genie, Chamberlain, Linear, and Liftmaster. Although the working principle of all of them is the same there are some changes in the circuit design, laser light colors, and the overall build.
Here in this article, we’ll try to figure out all the possible reasons behind this problem and will try to solve them without the need for any technician even if you can fix some problems on your own.
We’ve also covered this crucial information in this article:
- What to look for when testing your garage door sensor light?
- How to test your garage door sensor light and what are the required tools?
So without further ado…
Let’s get started…
Table of Contents
Some Reasons Behind Garage Door Sensor No Lighting With Solutions
Let’s figure out some most common reasons behind your garage door sensor not lighting and stopping working.
Reason 1: Interrupted Power Supply To The Sensor Light
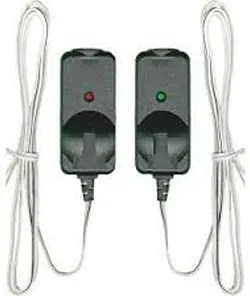
Your garage door sensor comes with two LED sensor lights. In most cases, one sensor light is yellow or amber in color and another one is Green. If any one of them or both are not lit, it may be due to there being some fault on the wire.
Solution:
You can solve the no-lighting issue in your garage door sensor by changing the faulty wire of the Led light that is not lighting.
Required Tools to fix the no-lighting issue of your garage door sensor:
- Auto Ranging Meter
- Plier
Step 1: First check the voltage of the LED that stopped lighting by using an Auto-ranging meter. In my case, it is 11 volts in both LED sensors.
Step 2: Both the LED light sensors are connected to the garage door opener in parallel. It ensures both sensors get the same voltage to operate.
You need to check the connection of the LED that not lighting on the garage door operator by touching the connectors of the power operator system with the Auto-ranging meter leads.
Make sure your Auto-Ranging meter is set to 2-volt DC.
Also Read: 3 Working Ways To Trick Garage Door Sensors
Step 3: When I checked the auto-ranging meter rating on the garage door operator system, it shows me 11 volts in both the LED connectors.
Step 4: Now check the Auto-Ranging meter rating on both LEDs. It must be the same as you have measured on the garage door operator system. In my case, it must be 11 volts in the LED connectors.
Step 5: Suppose my red LED is not lighting, in that case, I’m not getting any rating in my Auto-Ranging meter when I touch the Auto-Ranging meter leads to the RED led sensor.
It means, there is no power supply to the red LED sensor that’s why it is not lit.
Step 6: Now you have identified the cause of the main problem which is faulty wiring to the Red LED sensor connector and you need to replace the wire of this connector to light it up again.
Step 7: Now buy the garage door sensor wires through home depot or from your local electronic store and connect one side of that wire to the red LED sensor and patch it with screws tightly. The other side of the wire must be connected to the garage door power system.
Step 8: Now check the Auto-Ranging meter reading again to the Red LED sensor, to ensure it gets power or not. If it shows 11 volts on its display when you touch the Auto Ranging Meter leads to the Red LED sensor terminal, it means the problem is fixed.
Note: Interrupted power supply due to faulty wiring is also the main cause of both the garage door sensors not lighting up.
Also Read: Garage Door Opener Rail Bows When Closing[Solved]
Reason 2: Opaque LED Photo Eyes
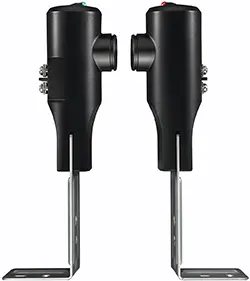
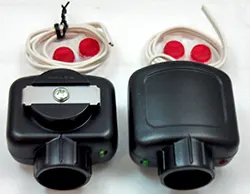
Your garage door sensor comes with two LED photo eyes. They are installed 6 inches off of your garage floor. They are aligned in such a manner that one can transmit and the other can receive the signal when they are in a straight line.
One photo eye can send the signal and is always ON. The color of this LED is amber or Yellow (in most cases).
The second LED sensor light is green. This is a receiving LED sensor that receives the signal from the LED sensor located on the other side of your garage door.
Problem:
If anyone of the photo eye or LED sensors is covered with dust and debris, it’s unable to send or receive the signal to the LED located on another side.
Sometimes you will not see the light of those LEDs because of the accumulation of dust over the LED sensors.
Solution:
Take a Towel paper or a clean old cloth and wipe the dust and dirt from the surface of the LED sensor. When they are cleaned, they will start working as earlier.
Also Read: Garage Door Won’t Close With Remote But Will Open [Solved]
No Light Issues with different brands of garage door sensors and their solutions
1. Chamberlain Garage Door Sensor No Light Issue
If you have a Chamberlain garage door sensor that is manufactured after Feb 2022 then it will not have a safety reversing sensor.

If both the LED sensors are not lighting then follow these steps to identify the cause of the problem so that we can fix it later.
Check For The Faulty Wiring & Incorrect Installation
- First install the Chamberlain safety reversing sensor, if you are using a Chamberlain garage door sensor manufactured earlier than Feb 2022. It will solve the problem of LED no lighting.
- If you’ve already installed it then check the wire connection. Check if the connection between the safety reversing sensor and the garage door opener is correct or not.
- Check if the white wire of the safety reversing sensor is connected to the white terminal of the garage door opener.
- Check if the white/black wire of the safety reversing sensor is connected to the black terminal of the garage door opener.
- Make sure the connection of the wires tugs properly.
- After inspecting the wire connections of your Chamberlain garage door sensor by following the above-mentioned methods, try to close the garage door using the remote control. If the door is closed properly it means the Chamberlain garage door no light issue is fixed.
2. LiftMaster garage door sensor has no light issue
Liftmaster garage door sensor no light issue is very common for a house owner and you can fix it by following the below Methods:
Method 1: First, check the wiring connection by following the above-mentioned methods.
Method 2: Check the Safety Reversing Sensors
To check the safety reversing sensors follow these steps:
Step 1: First, you need to remove the sensor from the garage door brackets.
Step 2: After removing the sensors, detach the wiring from the sensor by rotating the nuts or by cutting the wires.
Step 3: Now it’s time to strip the wires of both the sensors and twist the color wires together.
Step 4: Now take both the sensors and approach the garage door opener system.
Step 5: Face the garage door opener back and remove the existing wires from the white and grey terminals.
Step 6: Now take both the sensors and attached their white wires to the white terminals and the back/white wires to the grey terminals.
Step 7: Now point the sensors to each other and check if they are lighting or not. If they are lighting it means the problem is with the wiring. Change the wiring of your Liftmaster Garage Door Sensor to fix the no-lighting issue.
3. Genie garage door sensor no light
If you are using a Genie door sensor in your garage then inspect these parts of your garage door sensor for troubleshooting:
- Fuses
- Breakers
- Plugs
- Wiring
- Installation and connections
Thoroughly inspect the above-mentioned parts of your Genie garage door sensor if the LED lights are not ON or they are On but blinking continues.
If no LED sensor is ON then check the fuse of the Genie garage door sensor and change its copper wire that is melted or broken.
Your Genie door sensor has two LEDs sensors, one is for transmitting the signal that should be ON all the time (It is yellow In most cases) and another one (Green in most cases) is for receiving the signal from the first one.
If you will face any of the sensor LEDs not lighting then there may be some fault in its wiring or in its connection.
I’ve already discussed, how to check the wiring of your garage door sensor above, follow these steps to check for the fault in the wiring and connection.
Change the wiring and fix the connection to solve the Genie garage door with no lighting issue.
4. Linear garage door sensor no red light Issue
If you are using a Linear garage door sensor and its RED Led light is not ON then you have to inspect these areas to fix this issue:
- Check for the broken wire of your RED LED sensor. Sometimes your pet like your puppy may chew the low-voltage wire of your garage door sensor, or maybe the wire is broken for some reason. Change it to fix the Linear garage door sensor RED light issue.
- If your linear garage door LEDs are ON but blinking continuously then check for the garage door operator terminal, if it is blinking three times or not. If it is, it means your LED sensors are not aligned properly. Align them and fix this issue.
- The third and most important step is to clean the yellow and red LED sensors of your Linear garage door sensor with a cloth or towel paper.
- The last step to follow is to inspect the back panel of your garage door opener for the connection of the wire. Your linear garage door opener has three terminal screws, check them if the wires are connected properly on them or not. If not then connect them properly.
Conclusion
There are many reasons behind a garage door sensor no light issue. First, inspect the broken wiring and disconnected wires. Sometimes dust and obstacle particles also create this issue. I’ve mentioned a detailed step-by-step guide to fix this issue.
I hope this article will be helpful for you.
FAQ
Q.1 Why Are My Garage Door Sensors Not Lighting Up?
Ans: Your garage door sensor not lighting up because of broken wires, disconnected wires from the garage door opener terminals, Power interruptions, problems with the fuse, and many more.
Q.2 Should Garage Door Sensors Always Be Lit?
Ans: Only the sender LED sensor of your garage door system should always be lit and the receiving LED sensor is not always ON.
Q.3 Should Both Garage Door Sensors Have A Green Light?
Ans: No, the sender LED sensor is yellow (in most cases) and the receiving LED sensor is green. It blinks RED if misaligned or something obstructs its path.