

No one wants to use a loose faucet in their kitchen. A tight kitchen faucet helps to complete tasks efficiently. The nut that secures the kitchen faucet in place is located under the sink.
You can secure the kitchen faucet by tightening this nut under the sink. Most brands provide complete instructions on how to tighten kitchen faucet nuts under the sink, while some do not.
If you lack knowledge about this fix, then this guide will truly assist you.
Table of Contents
What Is a Faucet?
When you wash your hands or engage in any other activity, a faucet controls the flow of water from the sink. If it becomes loose, it can cause water wastage, which is very annoying.
5 Easy Steps To Tighten Kitchen Faucet Nut Under The Sink
If you haven’t done this task before, it may seem tedious, but it’s not. The only thing that complicates this job is if some parts of the under-the-sink assembly are corroded.

So the question is…
1. How To Tighten Kitchen Faucet Base?
The entire task can be completed easily if you have the right tools.
Tools for Tightening a Kitchen Faucet
- A basin wrench
- Adjustable pliers
In addition to the basin wrench and pliers, you may need a light source. A headlamp is recommended because light often doesn’t reach the bottom part of a basin.
2. Make Some Space Under The Sink If Necessary
Most kitchen basins come with installed shelves. Check under your kitchen basin, and if it has a shelf, try removing it to create more space to work.
If your kitchen basin has a sink p-trap, open it using adjustable pliers. Remove it by unscrewing all the nuts that hold the sink tailpiece and wall drain.
3. Get Someone to Help Keep the Faucet Steady
Once you locate the nut, you’ll need someone to help keep the faucet steady, as you can’t do this alone. Have someone assist you in aligning its position center according to the wall behind it.
Now you’re ready to work with the loosened nut. Go underneath the kitchen basin sink.
But wait, it’s too dark to work here…
You can use either a torchlight or a headlamp. If you don’t have a headlamp, then you can use a torch to make the nut area visible with the help of someone.
Also Read: Can You Use A Bathroom Faucet In The Kitchen:[A Detailed Guide]
4. Use Your Hand to Tighten the Kitchen Faucet Nut Under The Sink
Initially, a loose screw may require some handwork to tighten. Tighten it as much as you can with your fingers. Afterward, you can use tools to further tighten it if needed.
5. Use a Basin Wrench to Tighten the Kitchen Faucet Nut Under The Sink
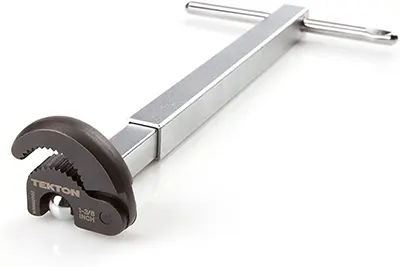
Once you’ve done some initial tightening by hand, use a basin wrench to securely tighten the nut. A basin wrench has grooved jaws and a long handle, making it ideal for reaching the under-the-sink nut. When you reach the nut, grip it with the grooved jaws of the basin wrench and rotate the handle clockwise to tighten it.
Doing this will tighten the nut of the kitchen faucet. Keep rotating the wrench handle until the nut is properly tightened, and the position of the kitchen faucet becomes stationary.
A basin wrench works well if the size of the nut is around 1 inch or less. For larger nut sizes, you can tighten it using your fingers or an adjustable wrench. Some new sink nuts are designed to have two screws on either side that can be tightened by hand.
Also Read: Bertazzoni Range Problems: A Quick Fix Guide
How to Tighten a Moen Kitchen Faucet Nut Under the Sink
Tightening the Moen kitchen faucet nut under the sink is relatively easier compared to other brands of kitchen faucets. Moen kitchen faucets typically come with a special long and deep nut driver tool included in the assembly.
Simply follow these steps to tighten the nut under the sink of a Moen kitchen faucet:
Step 1: Begin by closing the knobs of the water supply inlets for both hot and cold water located below the faucet.
Step 2:
Ensure proper safety measures by using the right tools:
- Screwdriver
- Adjustable wrench
- Safety glasses
Step 3: Position yourself so that the faucet handle is on your right side and the spout is in front of you.
Step 4: Check if the mounting washer is corroded. If corroded, replace it with a new one as a corroded mounting washer may fail to hold the sink nut tightly in its place.
Step 5: Take the mounting nut and turn it clockwise by hand. Before tightening it completely, ensure the handle of the kitchen faucet is on your right side and the spout is in front of you.
Step 6: After hand-tightening the mounting nut, use the installation tool to tighten it further to ensure the kitchen faucet remains stationary.
Step 7: Additionally, use a screwdriver placed at the end of the tightening tool to facilitate the tightening process.
Step 8: Finally, pay attention to the rough edge of the faucet sink. Use a hose guide nut and rotate it clockwise to secure the sink hose, preventing it from pulling down and rubbing against the edges.
Conclusion
It’s common for nuts of kitchen appliances to loosen over time as parts wear out. You can easily fix them by following the simple steps listed above, using appropriate tools, and your ingenuity.
While it may take some time and effort, completing the job successfully will leave you with a sense of accomplishment.
Also Read: How To Secure Outside Track Sliding Glass Doors [Solved]
Also Read: How To Lock A Sliding Glass Door From The Outside[Easiest Ways]
FAQ
Q.1 What if I don’t have a basin wrench?
Ans: If you don’t have a basin wrench, don’t worry! You can still tighten the kitchen faucet nut under the sink using alternative tools such as adjustable pliers or a pipe wrench. These tools offer versatility and can effectively secure the nut with proper handling.
Q.2 How do I know when the nut is tight enough?
Ans: Knowing when the nut is tight enough is crucial for a secure faucet installation. As a general rule, tighten the nut until it feels snug and there is no more movement or play in the faucet assembly. Be cautious not to over-tighten, which could lead to damage. If using a wrench, stop tightening once you feel resistance, indicating that the nut is securely in place.